Pages

27.10.10

Finishing Touches

What’s a party without drinks and chips?  Well, it could be a party with drinks and popcorn.  One important fact about Singapore: one bag of chips costs more than a box with three bags of microwavable popcorn in it.  Thus, today I’m sharing three flavored popcorns that were whipped up on the fly and some slimy punch to wash it down.


Super-simple Flavored Popcorn


Spicy Taco Popcorn

1.   Mix about ¼ cup melted butter/margarine in a small bowl with ½ a packet (about 2 Tbs) taco seasoning mix, a dash of salt/seasoned salt and a dash or more of chili powder depending on your love of spice (start small). 
2.   Pour the mixture over a bag of popped popcorn in a sealable bag or piece of tupperware.  Shake to coat. 
3.   Enjoy!


Cheesy Pizza Popcorn

1.   Mix about ¼ cup melted butter/margarine in a small bowl with 2 Tbs grated parmesan cheese (the cheap kind in the shaker) and a dash each of garlic powder, oregano, basil and salt.
2.   Pour the mixture over a bag of popped popcorn in a sealable bag or piece of tupperware.  Shake to coat.
3.   Enjoy!


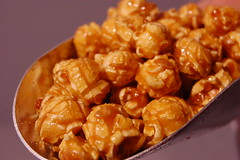
caramel popcorn Originally uploaded by uptown popcorn

Dessert Popcorn
This one is super yummy, but a *tad* more difficult…

1.   Melt ¼ cup of butter/margarine and 20 marshmallows (about 1 7oz jar of marshmallow crème) in a large bowl in the microwave at 1 minute intervals, stirring in between until melted and smooth.
2.   Stir ¼ cup of peanut butter into the melted marshmallows.
3.   Pour mixture over a bag of popped popcorn in a large casserole or baking dish and turn with a spoon or spatula to coat. 
4.   Bake in the oven at 300F (150C) for 15-20 minutes, stirring once in the middle.
5.   Enjoy!


Slime Juice

I would love to make a creepy and disgusting, blood-colored punch for Halloween, alas- I am deathly allergic to all things artificially red, which includes pretty much all red drinks and mixers.  And so I resort to creepy and disgusting SLIME.

     1.   Mix 1 bottle of champagne with 1 liter of orange juice and 2 cups of Blue Curacao or Midori.
     2.   Drink and be merry!


Variations:
o    Depending on where you live, liqueurs like Blue Curacao or Midori may be impossible to find or crazy expensive.  Last year I had to substitute one 8oz bottle of blue sports drink and 2 cups of light rum instead (and cut the orange juice in half).
o    I like to salvage the orange juice from my Orange-o’-lanterns for this punch.
o    Of course, the ratio of alcohol to fruit juice is always up to you! 

21.10.10

Orange-o'-Lanterns


What do you do when you live in Singapore, you absolutely love Halloween and a proper pumpkin costs $35+?  Well, when in the tropics…


It seems these guys have grown in popularity over the past year, which is great, because not only are there now more instructions and samples online, but I don’t have to make any unnecessary links or references to Martha Stewart.  Wait…oops. 

Anyway, my little orange army was so well received last year, that I was commissioned to make a few again for a community fair I was working at last weekend.  Luckily, this gave me the opportunity to document the technique for you: 


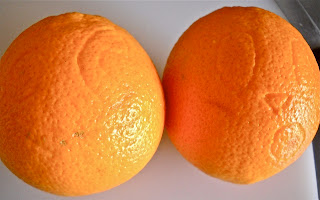
1.   Draw a pumpkin face on your orange(s) using a pencil and press hard.  This time I used a mechanical pencil without the lead and found it worked quite well.  When you make your design, keep it simple- it’s pretty tricky cutting out those little pieces. 


2.   Cut off the top of the orange and use a spoon to scoop out the insides.  Though not nearly as bad as a traditional pumpkin, this can still be quite a mess.  I’ve had the most luck digging the spoon a bit into the rind and often the wedges pop right out.

3.   Use a sharp paring knife to carefully cut out the face you drew.  I’ve read that you can use a “small craft knife” but darned if I know what that is or of anyone who has one [ohh Martha…].


4.   Then, I like to clean up the orange-o’-lantern by scraping the inside of the cut-outs with a small teaspoon.

5.   Fill with goodies and you have an army of tropical-style jack-o’-lanterns!


Suggested Fillings:
o    grapes, berries or other fruit pieces
o    assorted candy (candy corn works well, especially when it spills out the mouths)
o    a tea light candle (at your own risk!)
o    this version fills them with an interesting chocolate fudge (suggestion: find a way to work in some of the orange juice- don’t orange and chocolate go well together?)


Notes:
o    I didn’t end up lighting these as planned because they wouldn’t stand on their own.  The oranges will stay upright with other fillings, but you will want to find a way to weigh them down if you plan to put candles inside.
o    Last year I froze the oranges because I carved them the night before the party.  As a bonus feature, it turned out that the frozen oranges let off a spooky fog in the dark for first half hour or so of the party.
o    After gutting, the insides are kind of a mess, but it doesn’t have to be wasted.  Last year I squeezed all the juice out and used it in my slimy punch.  (This year, we just ate it…)


Variations:
o    The original version of these calls for filling them with orange sorbet.  This would be great if you have a couple of kids or a small dinner party unless you really like carving oranges.
o    I thought this was an instructional video.  Turns out it’s just a really funny 
      non-gutted orange-o’-lantern.

16.10.10

Morbid Munchies


There are TONS of cute, creepy or otherwise disgusting Halloween treats out there, but I chose these for their simplicity and young-adult friendliness.  For the original (and slightly more complicated) recipes as well as some other nasty nibbles, this site is my favorite collection of Halloween treats.


Mummy Crackers

     -    Ritz crackers (or similar)
     -    pizza sauce
     -    shredded mozzarella cheese
     -    black olives or small mushrooms     (like enoki)


1.   Spread Ritz crackers out on a baking sheet
2.   Spoon a little pizza sauce on each cracker
3.   Place sliced olives or upside down mushroom tops/caps as eyes
4.   Layer pieces of shredded mozzarella so that it looks like mummy bandages
5.   Pop in the oven (350oF/180oC) for just a couple minutes until the cheese just starts to melt. 


Witches' Finger Cookies


-     prepared cookie dough 
      (peanut butter or 
      sugar works best)
-     almonds

1.   Roll a tablespoon-sized ball of dough into an oblong, about three inches long and half an inch in diameter.
2.   Pinch the dough twice to form a knuckle and lightly flatten (see image below).  
    *important: exaggerate the shape and do not flatten much (if at all) as the dough will spread out while it bakes
3.   Push an almond into the end of each as a pointy fingernail and use a knife to cut a couple scratches in the knuckle like wrinkles (I didn’t do this in mine—so you won’t see it in the picture—but I wish I had)
4.   Bake according to dough instructions (usually 350oF/180oC  for about 10min) keeping a close eye so that they don’t burn. 
5.   Remove from oven and let cool before removing from cookie sheet.


11.10.10

Ice Capades


photo credit: Mike Bowler


No Halloween party is complete without some freaky ice tricks!


Eyeball Ice Cubes

These were the single biggest hit of the party.  I made a ton of eyeball-shaped ice cubes with blueberry pupils that floated blueberry-side up in everyone’s drinks and stared at them.  Here’s how to do it:


-     Find a round-shaped ice tray or egg carton.  I used a plastic egg carton, which worked perfectly.  If you don’t have plastic egg cartons at home, the styrofoam ones might work or look around for some of those silicon ice trays that come in different shapes. 
-     Place one blueberry in the center of each pit in your egg carton/ice tray.  Pour a small amount of water into each that covers the blueberry halfway or a bit more.  Pop in the freezer for a couple hours.  *You must fill the trays in steps because otherwise the blueberry will float to the top of the water and you won’t have a very convincing looking eyeball.
-     Once the blueberry is frozen in place, fill the pits all the way and freeze. 
-     Voila!  You have some freaky looking ice cubes!

Variation:
o    If you have access to an Asian grocery store, I recommend buying some tapioca pearls instead of blueberries.  They may take some more preparation because you’ll probably want to boil them and soak them in syrup before you use them.  However, I noticed nobody actually ATE the blueberries last year after their ice melted.  The pearls, on the other hand, are made to go in drinks and will probably turn out to be a yummy alternative.   


The Frozen Hand in the Punch Bowl

This is a popular one that can be found many places online.  (My favorite is here)  However, I noticed none of these sites ever explain how to get the hand to stand UP in the punch bowl, so I will :)


-     Take two plastic gloves, rinse/wash them and turn them inside out.  (make at least TWO because it’s no fun when the first hand melts too fast)
-     Fill them with water as far as you can and tie shut with a rubber band or a good snack clip. 
-     Pop in the freezer overnight so that it freezes solid.  I positioned mine on a bag of frozen veggies in the freezer so that it had a bit more “believable” shape.
-     Now, I made a big base so that my hands would stand up in the punch.  I took some simple take-out tupperware (so any medium-sized bowl or deep dish will do) and filled it about ¾ of the way with water.  Freeze that overnight too.
-     The next day, carefully remove the glove.  You may want to set it out for a minute or run it under cold water so that the glove is easier to remove.
-     Now the tricky part: place the hand on top of the block of ice and fill the remaining ¼ with water.  It does not stand on it’s own, but I was able to prop the hand against the shelf in the freezer while it finished freezing.  
-     Pop the base of its tray and place it in the punch when you’re ready to go!

Note:
o   I’ve read a few places that stress using a plastic glove (like the big ugly yellow ones) instead of latex for easier removal.  Truth be told, I made about four of these suckers last year and no matter how careful I was, I lost a finger every time.  In the end, I took the broken finger and propped it on the base so that it looked like it had fallen off.  Ew.

Variations:
o   An easier way to make the base may be to find a can/jar (like a coffee can) that the hand will not fit into entirely.  Set the hand on the jar and fill it with water until the base of the hand is submerged.   I’ve also read that you can prop the hand in a glass (without a frozen base entirely), put the glass in the middle of the punch bowl and fill the bowl with punch around it.
o   You can add all sorts of things to the water in the glove to make it more interesting.  The favorites are jello or red food coloring, but since I’m terribly allergic to all things artificially red, I went with orange juice.
o   Another fantastic alternative is to fill the glove with TONIC water.  Under a black light, the frozen tonic water will glow.

5.10.10

October Freaky Feature: Happy Halloween!


photo: neepster 


Halloween is my favorite holiday.  It’s not that I don’t love Christmas—in fact, I love Christmas just as much as anyone else—I just happen to love Halloween more [heh heh heh].  Halloween is such a wonderful excuse to have FUN.  Painted faces, silly costumes, scary movies, grinning pumpkins, childish games and creepy food…you might say it’s the most wonderful time of the year, really.


Last year was my first Halloween out on my own, away from home and out of college, and I just couldn’t wait to host my first “grown-up” Halloween party.  I spent the whole month of October planning it (and it took all of my will power not to start in September).   The problem with hosting your first grown-up Halloween party, however, is you’re busy and you’re broke.  Throughout the month, I was able to tuck-away a whopping $250 to spend on the whole ordeal: food, drinks, décor and– oh yeah –my costume.  It was a shoestring budget and I had to make all the food the morning of, but I managed to pull it off. 


How did I do it?

Well, dozens of tiny tea-light candles, a little free printing at work and throwing together a costume with clothes and make-up I already owned certainly helped—but some quick, creative recipes where what really made the party a hit.  So if you love Halloween as much as I do (or even if you don’t), this month I’ll be sharing ALL of the secrets behind my little Halloween tricks, snacks and treats.  Try them if you dare…


This month's tips for an easy and affordable Halloween bash: 


Essentials
- Excellent advice on homemade costumes can be found here.
- For a truly superb list of Halloween-themed cocktails (including how to make them glow) check out this blog: Drink of the Week


Décor
- Tea-light candles are the key to creating a great, spooky ambience.  Plus, they're abundant and cheap in any country.  Buy a pack and place them on tea/coffe cup saucers.  You can also cut an egg carton (plastic or cardboard) in half and place the tea-lights in them for a surprisingly stunning candelabra.  
- Spiderwebs are also a cheap and fantastic must-have.

Entertainment
- A&E's list of the 50 Scariest Movies of All Time
- Silly games that are quite a hoot:
  o  Vampires (Mafia w/ the names changed)
  o  Pin the Wart on the Witch
  o  Halloween Taboo
  o  Hallowopoly
  o  Scary Movie Trivia
  o  "The Withered Corpse" (body part guessing game)
Email me if you want instructions or templates for any of these games  

Happy Halloween!
^0,0^