Pages

30.12.10

Blackened Flank Steak and Sauteed Spinach

You may finally be finishing up your Christmas ham left-overs, but there's still time to sneak in one more red and green meal before New Years- that is, if you're a fan of red meat :)


Blackened Flank Steak

- 1lb flank steak
- Worcestershire sauce
- garlic and onion powder
- cajun seasoning or chili powder
- black pepper
- olive oil

1.  Moderately tenderize your steak with a hammer or by vigorously stabbing it with a fork on each side.
2.  Drizzle Worcestershire sauce on both sides of the steak and spread with a fork to coat fairly evenly.
3.  Lightly sprinkle with garlic, onion and cajun/chili powder, then coat with a hefty dose of black pepper.  (both sides)
4.  Meanwhile, heat a skillet over high heat and add oil to the pan.  When the oil is just about to smoke, throw in the steak and scorch each side for about a minute.  Turn the heat down to medium and continue to cook for 5 minutes on each side (medium rare) or until the steak reaches your desired level of doneness.
5.  Cut in long slices against the grain and you're ready to eat!

[Serves 2]


Notes
  • I have trouble finding flank steaks in the US anywhere but Super Target.  This may be an anomaly, but if not, a skirt steak or a flank steak masquerading as a "London broil" will also do.
  • A fillet knife makes slicing this steak a breeze, but I've found that a big bread knife is pretty good for slicing beef too.
  • I often find when blackening that a ton of my pepper and spices come off in the pan and burn up.  If you dust some more pepper while it's cooking, you'll still have a mess, but you won't lose too much flavor.  Some other ways I've seen to keep better hold of your spices include:
    • Rubbing the spices into the meat
    • Lightly coating the meat in oil first 
    • Mixing oil/butter in a bowl with the spices before coating, then using the same mixture to baste the meat throughout cooking
    • Coating the meat in raw egg white before seasoning
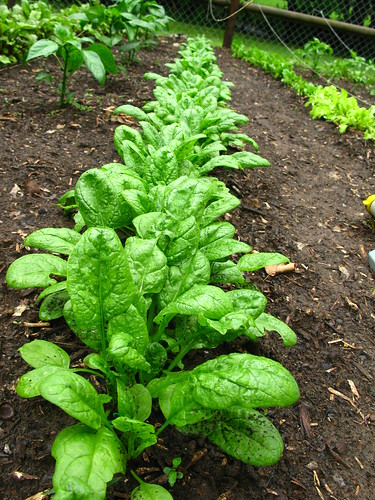

Sauteed Spinach

- 2-4 cups fresh, raw spinach leaves
- 2 cloves of garlic sliced / garlic powder / garlic granules
- grated parmesan cheese
- olive oil

1.  Heat a skillet over medium-high heat.  Add about a tablespoon of oil and season the oil with the garlic.
2. Throw in the spinach and saute for no more than 5 minutes, keeping the spinach moving in the pan with a spatula.  Just as all the spinach is wilting, sprinkle lightly with parmesan cheese and remove from pan.
3.  Ready to eat!
[Serves 2]

Recipe adapted from Quick and Easy Sauteed Spinach by Denee on Allrecipes.com

22.12.10

Holiday Ham and Cheesy Spinach Potatoes


One of my big guilty pleasures in life- ranking right up there with a mild soap opera addiction -is a deep fondness for the blue box, good old Kraft macaroni and cheese.  On those rare occasions when I find myself cooking for one, it's what I nearly always turn to.  What meat to pair with that lovely dish was always the challenge, though, until one evening I made a miraculous discovery at Singapore's Cold Storage: fully cooked "ham ends" in the pizza topping section [!?] in 400-500 gram packages for only about $2.  I threw those chunks of ham in a skillet and heated it up with a some honey, white & black pepper and a bit of soy sauce and WOW.


People may frown at serving chopped "ham ends" and macaroni and cheese for Christmas dinner, so I've adapted and tested the recipe on a whole ham and paired it with some cheesy spinach potatoes for the Holidays.  Though if you ever get the chance (or find yourself with left-over ham at some point), I do strongly recommend preparing it the original way...


Megan's Holiday Ham

- a squeeze bottle of honey
- about 1/4-1/2 cup of soy sauce
- lots of black and white pepper
- one fully-cooked ham for two* (preferably spiral cut!)
*small hams are hard to find and it's nearly impossible to get one that's less than a pound.  so be prepared for this meal to serve 4, or have plenty of left-overs for 2!

1.  If you have time, marinade the ham for a few hours or over night in a plastic bag in the refrigerator.  Put the ham and soy sauce in the bag and squeeze as much air as possible out of the bag.
2.  Preheat the oven to 350F and place the ham on a large piece of aluminum foil inside a baking dish.  If the ham is not spiral cut, cut a deep diamond pattern all over the ham, about 1/4" thick.
3.  Fold up the sides of the foil to form a bowl.  If you have a fully-cooked ham, pour the soy sauce from the marinade bag back over the ham (otherwise, throw out the marinade and use fresh soy sauce).
4.  Sprinkle the ham liberally with both peppers then squeeze honey on top.  Spread out the honey to coat the ham with a brush or spoon and be sure to get BOTH the honey and pepper into the individual spiral slices or cuts.
5.  Close the foil over the top of the ham and bake for 45min-1hr.  Every 15 minutes or so, open the foil and spoon some soy sauce juice back over the ham to baste it.  You may also want to add more honey and pepper halfway through cooking.
6.  Ready to eat!

Notes
  • The standard rule-of-thumb for ham baking times is 20 minutes/pound.  However, for the sake of cooking in the flavor, I usually cook even tiny hams for an hour.
  • If you have time and your ham will fit, slow cooking it for about 4-6 hours is a great way to really cook in flavors to your ham. 

Variations
There are countless great ways to flavor a ham.  A classic Holiday ham usually involves poking cloves into the diamond cuts on the ham, but here are some great baste/glaze combinations to try:
  • baste: apple cider / glaze: brown sugar & honey
  • baste: beer / glaze: pineapple juice & brown sugar
  • baste: balsamic vinaigrette / glaze: honey or dijon mustard
  • baste: orange juice and bourbon or whiskey / glaze: molasses & honey
  • baste: root beer or Dr Pepper / glaze: brown sugar, ketchup & steak/Worcestershire sauce


Cheesy Spinach Scalloped Potatoes

- 2-3 red/new potatoes
- about 2 cups fresh spinach
- 1 cup shredded cheddar-based cheese blend
- 1/2 cup of milk
- half an onion
- bacon bits
- butter/margarine


1.  Preheat oven to 350F and melt a little butter in a small/medium skillet.
2.  Slice the onion and heat in the skillet until soft and just starting to carmalize.
3.  Wash the potatoes and cut into thin slices. Line the bottom of a small casserole/baking dish with 1/3 of the potato slices.  Layer with spinach and top with 1/3 of the cheese, onions and bacon bits.  Repeat for 2 more layers.
4.  Pour the milk over the top of the casserole and bake for 45min-1hr.
5.  Ready to eat!

[Serves 2]

Notes
  • You can heat the milk with some butter in the skillet before pouring it over the pan or substitute buttermilk, full cream, whipping cream or softened sour cream for the milk.
  • I've made this dish twice over the past week and have finally made a decision on fresh vs. frozen spinach.  Frozen spinach is a mess!  And a whole lot of trouble.  When I used fresh spinach on these the first time around, it stacked pretty high at first, but the spinach cooked down and the top layer had a nice crispiness to it.  It fresh spinach for me from now on...
Recipe adapted from Spinach Potatoes by erinsanders on Allrecipes.com

20.12.10

Fresh and Festive Salads

Tomatoes aren't the only way to spruce up a salad these days.  Mix in fresh red fruits with your salad greens to bring a little holiday cheer to your dinner table.  Then, add a little left-over ham, chicken or turkey to make your side salad a meal!


Strawberry Pecan Delight

- salad greens blend (try mixing and matching: spinach, romain, red-tipped lettuce, arugala and endive)
- sliced fresh strawberries
- chopped pecans
- sunflower seeds
- grilled chicken pieces or chunks


1.  Add all ingredients to a large, seal-able bowl.
2.  Drizzle with a light vinagrette dressing such as red wine or balsalmic.
3.  Seal the lid to the bowl and shake until well-mixed.
4.  Ready to eat! 


Cran-Apple Salad

- salad greens blend (try mixing and matching: spinach, romain, red-tipped lettuce, arugala and endive)
- crumbled blue cheese
- dried cranberries
- red and green apples, cut into chunks
- chopped walnuts
- turkey (left-overs in chunks or deli slices cut into strips)

1.  Add all ingredients to a large, seal-able bowl.
2.  Drizzle with balsalmic vinagrette or a quick mix of lemon juice and light mayonnaise.
3.  Seal the lid to the bowl and shake until well-mixed.
4.  Ready to eat!


Other fun and fruity ways to bring a little red to your holiday salad:
  • cherry tomatoes
  • grapefruit
  • raspberries
  • fresh cranberries
  • red grapes
  • red nectarines
  • raisins
  • dried or fresh cherries

11.12.10

Hearty Beef and Spinach Pasta

Quick, dirty and festive!
This all-in-one meal gets dinner done!


- bow tie (farfalle) pasta... about 2 cups dry
- 1/2lbs+ of ground beef (.2 to .3kg)
- 8oz. can of tomato sauce or paste
- 8oz. of whipping cream
- fresh, raw spinach
- shredded mozzarella cheese
- garlic powder
- onion powder


1.  Boil pasta according to package directions.  Drain.
2.  Spray a large saucepan lightly with cooking spray and begin browning the beef over medium-high heat with a dash each of garlic and onion powder.
3.  When the meat begins to change color, add the tomato sauce and cream.
4.  Bring to a boil.  Turn heat to low and let simmer for about 5-10 minutes.
5.  Stir in the cooked pasta, cheese and spinach.
6.  Pasta is finished when the cheese melts and the spinach begins to wilt.
7.  Enjoy!
[Serves 2]


Notes:
  • A lot of people like to drain the fat from their beef.  I prefer to buy lean beef so I can skip that step and let the meat cook in the sauce.  To drain your beef, cook it fully first (about 5-10 minutes 'til there's no more pink) then remove it to a bowl or plate lined with a paper towel for a few minutes before putting it back in the pan with the sauce.
  • How much cheese and spinach?  I throw both in by the handful, but start with about 1/2 cup of cheese and 2 cups of fresh spinach and add on from there as you please.
  • To make this dish a more rounded meal, add chopped onions, tomatoes and mushrooms!

3.12.10

December Diet: Spinach Greens

Ready for Cooking
Ready for Cooking originally uploaded by luckyjimmy
I don't know how many times someone has mentioned to me that the more colors you have in your meal the better it is for you.  Well, it's true- when the color comes from an array of fruits and vegetables, that is.  Different colors of fruits and veggies all bring different nutrients to the mix.  Reds have lycopene, an antioxidant good at fighting heart disease.  Orange and yellows have beta-carotene and Vitamin C.  Blues and purples have cancer-fighting phytochemicals and all sorts of good stuff like folic acids, fiber and potassium.  Whites (like onions, garlic and cauliflower) have allicin, indoles and sulfaforaphanes that help battle cholesterol, high blood pressure, infections and cancer.  And good old greens are full of antioxidants, folate vitamins, minerals and fiber.

This month, to celebrate the season and a healthy, colorful plate, all our recipes will be red and green, with an emphasis on leafy spinach greens.


Why Spinach?

Home Grown Spinach
Home Grown Spinach originally
uploaded by OakleyOriginals
Some time last year I read an article about all the antioxidant rich foods that you should incorporate into every meal.  Fresh spinach was the king of that list, so I set out to find a way to include spinach in 3-4 meals a week.  I haven't quite maintained that enthusiasm, but I still try to throw spinach into my meals whenever I can.  

Spinach is so rich in antioxidants and vitamins, the list is almost absurd.  In fact, here it is: vitamins A, C, E, K, B2 & B6, magnesium, manganese, folate, betaine, iron, calcium, potassium, folic acid, copper, protein, phosphorus, zinc, niacin, selenium and omega-3 fatty acids.  The best way to preserve the nutrients in spinach is to each it fresh, steamed or briefly boiled as prolonged boiling can reduce some of the nutrient content (although, really not enough to be too fussed about!).  

You can buy spinach fresh (and often conveniently bagged as just rinse they're ready-to-eat leaves) or in frozen bags.  Both forms take about the same amount of work and are just as good for you.  Since frozen veggies are usually frozen very fresh, they often pack just as many nutrients, if not more, than the fresh greens in the produce section.  I prefer to work with fresh spinach, but for most of the recipes this month, the frozen variety will do just as well.

Here are some great ways to start incorporating spinach into your meals and snacks:
  • Throw out the iceberg and make spinach your go-to salad green!  You can add a small, restaurant-style side salad to every meal by quickly plopping some spinach leaves, onions and cherry tomatoes on your plate nestled up next to your entree.  For larger salads, toss spinach in with green lettuce like romain or butterhead for a healthy, green mix.
  • Spinach is a great addition to nearly every pasta.  Throw it in with chicken alfredo or beefy tomato or bolognese dishes.   Layer it into lasagne or bake it into your cannelloni or ravioli stuffing. 
  • Mix it with a little cheese and roll it into a variety of pastries such as cresents or puff pastries
  • Add spinach, cheese and ham/bacon to your eggs to make a hearty breakfast quiche, omelet or frittata.   
  • Next time you make a casserole, mix in some spinach.  You might not even realize it's there!
  • Add it to your pizza toppings. 
  • Layer it into a sandwich- especially a hot/grilled one.  
  • Don't forget to keep spinach dip on-hand for snacks and entertaining.

Happy Cooking!
popeye the sailor man

30.11.10

Scalloped Potatoes


For our final potato installment, I'll leave you with scalloped potatoes.  The most common version involves smothering sliced potatoes with a white cream sauce made up of a mix of flour and butter.  While those are delicious, there's always an easier alternative (and I'm not talking out-of-a-box).  This recipe makes use of soup and sour cream for a great creamy finish.


- about 1/2 a can of cream of mushroom soup
- 1/4 cup of sour cream
- 1/4 cup of water or chicken broth
- enough potatoes for 2 people (2 russet or 3-5 gold, white or red potatoes)

1.  Preheat the oven to 350.
2.  Wash & peel the potatoes, then cut into thin slices.
3.  In a large bowl, mix the soup, sour cream and water.
4.  Spray a small baking dish with cooking spray and layer with half the potatoes.  Pour half the soup mixture on top, then make a second layer of potatoes and soup.
5.  Bake for about an hour, or until tender.
6.  Enjoy!
[Serves 2]


Variations
  • This is another dish that I love to experiment with.  You can use nearly any cream soup, although the most popular alternatives mix grated cheese with sour cream or cream cheese.  The easiest by far, though, is a simple mix of melted butter and cheese smothered over the potatoes.  
  • Some people recommend covering the potatoes for the first 45 minutes before letting the tops brown for the last 15-20.
  • *Make this dish a meal by adding chopped ham and some peas or other veggies to the mix!  

21.11.10

Twice Baked Potatoes


Last year was my first Thanksgiving away from my mother's table and in addition to my natural aversion to traditional Thanksgiving buffets, I was not at all ready to tackle the whole meal all on my own. Fortunately, I was not alone and my fellow quarter-lifers who were stranded in Singapore for the holiday decided to band together for a pot-luck of sorts. The company was fabulous, the sides were delicious, the homemade pumpkin pie was devine, but the pre-cooked [and surprisingly pre-carved] turkey was what really made the day [ha!].

My contribution to the smorgasbord: twice baked potatoes.

If you're looking for something to bring to your own Thanksgiving pot-luck or want to impress your family by chipping-in this year, twice baked potatoes are a great way to go.  What's best: they're an easy and delicious side-dish cleverly disguised as fancy food.


- 1/4 cup [or less] of sour cream
- 1/4 cup shredded cheddar cheese
- 1 Tbs butter/margarine
- a dash of garlic powder and basil and/or parsley
- 2 large potatoes

1.  Bake the potatoes for about a hour or until crispy.
2.  Cut the potatoes in half and scoop out the contents, being careful to leave about a 1/4 inch of flesh on the skin.
3.  Mash the potatoes in a large bowl with the sour cream, butter, spices and about half the cheese.
4.  Spoon the mashed potatoes back into the hollow potato skins and sprinkle the remaining cheese on top.
5.  Bake for another 15 minutes or until the cheese is melted.
6.  Enjoy!
[Serves 2]


Notes
  • I actually throw out a skin or two so that the mashed parts really fill the skins.  If you're multiplying this recipe I would probably toss out 1 of every 4 half-potato skins or so.
  • Alternatively, some people recommend cutting off as little of the top of the potato as possible rather than cutting in half.    
  • I just read a claim that microwaving the potatoes for a minute or two first cuts the baking time in half.  I will have to give this a try some time and validate it...
  • I have not tried this yet, but this year I'm going to pop the skins in the oven while I mash the insides.  I'm hopping this will crisp up the skin "bowls" a bit more.  Will report back if it works!

Variations
  • Like the loaded mashed potatoes, the exact amount of butter, sour cream and cheese in your mix will be up to you!  The measurements given are the most common among recipes I've read.
  • A few versions swap out the sour cream with cream cheese.  Very tempting, hmmm.
  • Experiment with these!  I've given the classic version, but you can mix-in and top-on all sorts of things!  This year I'm thinking of making bacon-swiss versions with swiss cheese and bacon on top with a pinch of parmesan mixed-in.  Other common mix-ins are chives, paprika, chili powder, eggs and even ranch dressing!

18.11.10

Loaded Mashed Potatoes


It's a real shame- I went nearly 20 years of my life thinking I hated mashed potatoes because of those awful imitation blobs they served in the high school cafeteria. Luckily, I'm prone to do odd and impulsive things and one Friday evening as a senior in college, preparing to surprise my post-grad boyfriend with dinner in his Manhattan apartment and armed with merely a fork and a bowl, I got the brilliant idea to smash up a potato.  Maybe it was the hard labor I had to put into mashing that thing, but it was fabulous, and I've been a mashed potato devotee ever since.

I had been loyally mashing up the standard milk and butter potatoes until last Christmas when I received a great recipe for mashed potatoes with brie.  Those were heavenly, but since brie was typically a little out of my price range (Singapore cheese prices, *sigh*), that recipe has evolved into the exorbitant mess I bring you today:


- grated cheese of choice (cheddar is the best bet, small amounts of parmesan are divine and, of course, brie is awesome if you have the luxury)
- about a Tbs of butter/margarine
- a dollop of sour cream
- a dash each of parsley, basil and garlic powder
- bacon bits
- milk as needed
- works best with: yellow or white potatoes, but most others will be just fine


1.  Rinse and wash potatoes and remove any eyes or dark spots.
2.  Chop potatoes into quarters and cover with water in a saucepan or pot.
3.  Bring to a boil and cook for about 15-20 minutes more, until the potatoes start to fall apart and the skins are trying to peel off.
4.  Remove the potatoes to a large bowl and add everything but the milk.  Mash with a big wooden spoon until the potatoes reach your desired consistency.  If the potatoes are too dry, add small amounts of milk and continue mashing and mixing until you're pleased with the results.
5.  Enjoy!


Notes
  • Since this recipe uses sour cream, there shouldn't be much of a need for milk- if at all -so be sure to mix everything up without the milk first. Otherwise, you're potatoes will be a bit too wet, like the ones in the top photo.
  • Mashing methods vary.  A big spoon, even of the non-wooden variety, is the most popular method and is much easier than you think.  You can also buy spiffy mashers at most kitchen stores that look like this.  My mother always used an electric egg-beater to make super smooth potatoes.  And if you're daring, you could always try the little fork.
  • All the ingredients should be added by taste and the measurements given are just a starting point.  After a time or two, you'll know how much cheese, garlic and sour cream flavor you want your loaded potatoes to have.

Variations
  • You'll notice that I do not remove skins in this recipe.  Some people like them and think keeping them in makes your mashed potatoes a bit fancier. They also claim that the skins pack more nutrients.  At any rate, if you just hate potato skins, instead of painstakingly peeling your potatoes before you boil them, I recommend boiling them skin on and in bigger chunks.  The skins pull right off after they're cooked.  
  • Basic mashed potatoes use just butter and milk, but you can mix in any variety of spices and mix-ins to make them loaded to your liking.  I've seen some good recipes with: 
        - garlic and rosemary
        - feta cheese, whipped cream and pepper
        - nutmeg and salt
        - apples, bacon bits and onion

11.11.10

Roasted Potatoes

Deceptively devine, few side-dishes are as easy and painless as roasted potatoes.


- spray oil/butter, olive oil or melted butter
- spices of choice
- works best with: red/new potatoes or small yellow or white potatoes


1.  Preheat the oven to 350F/175C
2.  Wash the potatoes with a brush or the scrubbing side of a sponge, being careful not to scrape away the skin.  Then, use a teaspoon to dig out any big eyes or knots.
3.  Chop the potatoes in halves and then quarters (or any other preferred "shape")
4.  Lightly coat with butter or oil and place skin-side down on a baking sheet.  I prefer to lay out the potatoes on a baking sheet and simply spray them with vegetable/olive oil spray.  Alternatively, you can lightly rub them or mix them in a bowl with oil or melted butter.
5. Sprinkle with seasonings.
6. Bake for 30-45 minutes or until the edges begin to puff up and turn brown at the corners.
7.  Enjoy!


Seasoning Suggestions:

Roasted potatoes are a truly excellent opportunity to experiment with flavors and combinations.  Those pictured were a happily successful attempt with coriander, garlic, a dash of cajun spice and some left-over instant cheese sauce powder.  The cheese powder made an delicious crispy coating, and I only wish that I had used more!  Here are some more traditional seasoning mixes:
  • parsley, garlic powder, onion powder and salt
  • lemon juice, garlic, dill weed, black pepper
  • garlic powder, onion powder and italian seasonings (rosemary, basil, oregano)
  • oregano, mint, garlic, salt and a dash of lemon juice
  • chili powder or red pepper flakes, garlic, onion powder and salt
  • a package of instant soup powder such as french onion or cream of mushroom
  • shredded cheddar cheese

Note:
  • For my many oven-less friends, unfortunately, I've never tried these bad boys without an oven.  However, I have a feeling that they would turn out pretty well pan-fried as well.  They just might not be as crispy.

2.11.10

Perfect Potatoes

"Frieslander" potatoes
I must admit, I don't get into Thanksgiving quite as much as I do Halloween. Not really at all, actually. Aside from the turkey and the cranberry sauce, what do you have? Stuffing, squash, corn, candied yams, pumpkin pie...starch, starch and more starch.  No wonder you always feel fat when the meal is done.  One popular Thanksgiving-day starch that I will always support, however, is the potato.


You should always have a sack of potatoes in your kitchen.  Not only are they a reliable, staple side-dish, but they also last for ages.  [Although, not quite for 3.5+ months as a certain significant other of mine had to learn the hard way]  There's also about a million and a half wonderful ways that you can prepare a potato, so they'll never get boring.  And while I would love to test and share every single one of them, for the sake of this blog and this month's theme, I'll start by covering some potato side-dish basics that have been a regular part of my meal rotation since I first found myself in my own kitchen two years ago.


And so I begin with how to
make the perfect baked potato:

- olive oil
- salt
- butter/margarine
- works best with:
ordinary brown/Russet potatoes, the bigger the better!


1.  Preheat the oven to 350F/175C
2.  Wash the potatoes with a brush or the scrubbing side of a sponge, being careful not to scrape away the skin.  Then, use a teaspoon to dig out any big eyes or knots.
3.  Stab each potato numerous times with a fork or knife and lightly dry them with a paper towel.
4.  Pour the olive oil into a small bowl and dip each potato into the oil and roll it around a bit.  Then, sprinkle salt all over the potato.
*I find the most effective way to do this is not to be afraid of getting messy.  After dipping the potato in oil, I pick it up, smear the oil around with my hand and then hold the potato over the sink while I sprinkle salt on it.  I then put each one straight in the oven as I go...this can actually be pretty efficient if you manage to do the dipping and oiling with one hand and salting & oven door operating with the other.


5.  Place the potatoes directly on the oven rack with an aluminium foil-wrapped cookie sheet or drip pan underneath.
6.  Bake for about an hour, depending on the size of the potatoes.  The best way to know that the potatoes are done is that the skin will get crispy and puffed and sticking a fork in them should be as easy as butter.
7.  Slice each potato open either with a knife or by stabbing a line across the middle with a fork and pressing the sides.  Be careful because the potatoes will be hot- I usually handle them with a paper towel until they're ready to eat.

8.  While the potato is still hot, use a fork to gently break up the insides and plop your desired mound of butter on top.  This way, you mix a great and subtle buttery taste right in with the potato.
9.  Top with any exciting array of your
favorite toppings.
10.  Enjoy!


Notes:
  • Don't be fooled into thinking this is a time-consuming task.  So long as you don't mind sitting back and relaxing while the potatoes cook, baked potatoes are pretty simple.
  • If you have it, sea salt makes for the ideal salt coating.

Variations:
  • Microwaving.  It can speed up the process, and is an unfortunate necessity for the oven-deprived, but I don't recommend it.  I also can't give proper instructions because microwaving a potato is a fine art which depends heavily on the microwave and the potato at hand.  If you dare to microwave, though, stay true to the fork-poking test and do not cut the potato open until you're certain it's cooked.  A cut potato will never finish cooking in the microwave.
  • Steaming.  My dearest and most recent roommate somehow manages to live both without an oven AND a microwave.  And this did not bode well the day I absent-mindedly set out to make baked potatoes with dinner.  What I learned that day is that boiling a pot of water with the potato in a steamer basket or on top of a steamer tray for about an hour makes for a decently cooked potato. 
Happy Cooking! 
Kid's Mr. Potatohead Version 2.0 - 0920200911661

27.10.10

Finishing Touches

What’s a party without drinks and chips?  Well, it could be a party with drinks and popcorn.  One important fact about Singapore: one bag of chips costs more than a box with three bags of microwavable popcorn in it.  Thus, today I’m sharing three flavored popcorns that were whipped up on the fly and some slimy punch to wash it down.


Super-simple Flavored Popcorn


Spicy Taco Popcorn

1.   Mix about ¼ cup melted butter/margarine in a small bowl with ½ a packet (about 2 Tbs) taco seasoning mix, a dash of salt/seasoned salt and a dash or more of chili powder depending on your love of spice (start small). 
2.   Pour the mixture over a bag of popped popcorn in a sealable bag or piece of tupperware.  Shake to coat. 
3.   Enjoy!


Cheesy Pizza Popcorn

1.   Mix about ¼ cup melted butter/margarine in a small bowl with 2 Tbs grated parmesan cheese (the cheap kind in the shaker) and a dash each of garlic powder, oregano, basil and salt.
2.   Pour the mixture over a bag of popped popcorn in a sealable bag or piece of tupperware.  Shake to coat.
3.   Enjoy!


caramel popcorn Originally uploaded by uptown popcorn

Dessert Popcorn
This one is super yummy, but a *tad* more difficult…

1.   Melt ¼ cup of butter/margarine and 20 marshmallows (about 1 7oz jar of marshmallow crème) in a large bowl in the microwave at 1 minute intervals, stirring in between until melted and smooth.
2.   Stir ¼ cup of peanut butter into the melted marshmallows.
3.   Pour mixture over a bag of popped popcorn in a large casserole or baking dish and turn with a spoon or spatula to coat. 
4.   Bake in the oven at 300F (150C) for 15-20 minutes, stirring once in the middle.
5.   Enjoy!


Slime Juice

I would love to make a creepy and disgusting, blood-colored punch for Halloween, alas- I am deathly allergic to all things artificially red, which includes pretty much all red drinks and mixers.  And so I resort to creepy and disgusting SLIME.

     1.   Mix 1 bottle of champagne with 1 liter of orange juice and 2 cups of Blue Curacao or Midori.
     2.   Drink and be merry!


Variations:
o    Depending on where you live, liqueurs like Blue Curacao or Midori may be impossible to find or crazy expensive.  Last year I had to substitute one 8oz bottle of blue sports drink and 2 cups of light rum instead (and cut the orange juice in half).
o    I like to salvage the orange juice from my Orange-o’-lanterns for this punch.
o    Of course, the ratio of alcohol to fruit juice is always up to you! 

21.10.10

Orange-o'-Lanterns


What do you do when you live in Singapore, you absolutely love Halloween and a proper pumpkin costs $35+?  Well, when in the tropics…


It seems these guys have grown in popularity over the past year, which is great, because not only are there now more instructions and samples online, but I don’t have to make any unnecessary links or references to Martha Stewart.  Wait…oops. 

Anyway, my little orange army was so well received last year, that I was commissioned to make a few again for a community fair I was working at last weekend.  Luckily, this gave me the opportunity to document the technique for you: 


1.   Draw a pumpkin face on your orange(s) using a pencil and press hard.  This time I used a mechanical pencil without the lead and found it worked quite well.  When you make your design, keep it simple- it’s pretty tricky cutting out those little pieces. 


2.   Cut off the top of the orange and use a spoon to scoop out the insides.  Though not nearly as bad as a traditional pumpkin, this can still be quite a mess.  I’ve had the most luck digging the spoon a bit into the rind and often the wedges pop right out.

3.   Use a sharp paring knife to carefully cut out the face you drew.  I’ve read that you can use a “small craft knife” but darned if I know what that is or of anyone who has one [ohh Martha…].


4.   Then, I like to clean up the orange-o’-lantern by scraping the inside of the cut-outs with a small teaspoon.

5.   Fill with goodies and you have an army of tropical-style jack-o’-lanterns!


Suggested Fillings:
o    grapes, berries or other fruit pieces
o    assorted candy (candy corn works well, especially when it spills out the mouths)
o    a tea light candle (at your own risk!)
o    this version fills them with an interesting chocolate fudge (suggestion: find a way to work in some of the orange juice- don’t orange and chocolate go well together?)


Notes:
o    I didn’t end up lighting these as planned because they wouldn’t stand on their own.  The oranges will stay upright with other fillings, but you will want to find a way to weigh them down if you plan to put candles inside.
o    Last year I froze the oranges because I carved them the night before the party.  As a bonus feature, it turned out that the frozen oranges let off a spooky fog in the dark for first half hour or so of the party.
o    After gutting, the insides are kind of a mess, but it doesn’t have to be wasted.  Last year I squeezed all the juice out and used it in my slimy punch.  (This year, we just ate it…)


Variations:
o    The original version of these calls for filling them with orange sorbet.  This would be great if you have a couple of kids or a small dinner party unless you really like carving oranges.
o    I thought this was an instructional video.  Turns out it’s just a really funny 
      non-gutted orange-o’-lantern.

16.10.10

Morbid Munchies


There are TONS of cute, creepy or otherwise disgusting Halloween treats out there, but I chose these for their simplicity and young-adult friendliness.  For the original (and slightly more complicated) recipes as well as some other nasty nibbles, this site is my favorite collection of Halloween treats.


Mummy Crackers

     -    Ritz crackers (or similar)
     -    pizza sauce
     -    shredded mozzarella cheese
     -    black olives or small mushrooms     (like enoki)


1.   Spread Ritz crackers out on a baking sheet
2.   Spoon a little pizza sauce on each cracker
3.   Place sliced olives or upside down mushroom tops/caps as eyes
4.   Layer pieces of shredded mozzarella so that it looks like mummy bandages
5.   Pop in the oven (350oF/180oC) for just a couple minutes until the cheese just starts to melt. 


Witches' Finger Cookies


-     prepared cookie dough 
      (peanut butter or 
      sugar works best)
-     almonds

1.   Roll a tablespoon-sized ball of dough into an oblong, about three inches long and half an inch in diameter.
2.   Pinch the dough twice to form a knuckle and lightly flatten (see image below).  
    *important: exaggerate the shape and do not flatten much (if at all) as the dough will spread out while it bakes
3.   Push an almond into the end of each as a pointy fingernail and use a knife to cut a couple scratches in the knuckle like wrinkles (I didn’t do this in mine—so you won’t see it in the picture—but I wish I had)
4.   Bake according to dough instructions (usually 350oF/180oC  for about 10min) keeping a close eye so that they don’t burn. 
5.   Remove from oven and let cool before removing from cookie sheet.